

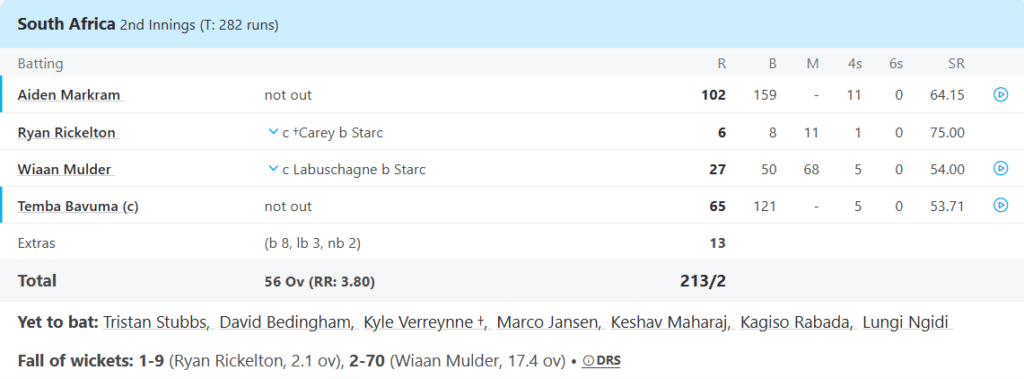
The third day of the ICC World Test Championship (WTC) Final 2025, held at Lord’s on June 13, 2025, was a pivotal moment in the contest between Australia and South Africa. South Africa, chasing a target of 282, ended the day at 213 for 2, needing just 69 runs to secure a historic victory.
The day was dominated by an unbeaten 143-run partnership between Aiden Markram and Temba Bavuma, who put South Africa on the brink of glory. Below is a detailed account of Day 3, covering the match overview, key moments and performances, and bowling analysis.
Match Overview
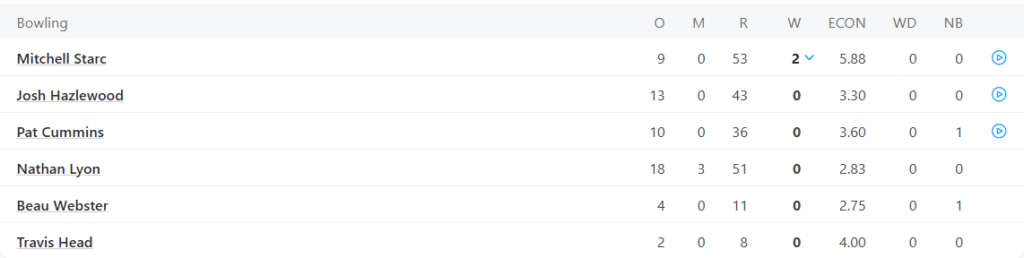
Day 3 began with Australia at 144 for 8 in their second innings, leading by 218 runs. Their goal was to extend the lead and set a challenging target for South Africa. Mitchell Starc (58*) and Josh Hazlewood (17) added 59 runs for the ninth wicket, frustrating South Africa’s bowlers. Kagiso Rabada eventually broke through, dismissing Hazlewood and Nathan Lyon (2) to wrap up Australia’s innings at 207, setting a target of 282.
South Africa’s chase started poorly, with Dean Elgar (0) and Ryan Rickelton (6) falling to Mitchell Starc, leaving them at 12 for 2. However, Aiden Markram and Temba Bavuma steadied the innings with a monumental partnership. By stumps, South Africa were 213 for 2, with Markram unbeaten on 102 and Bavuma on 65. Their 143-run stand for the third wicket put South Africa in a commanding position, needing only 69 runs on Day 4 with eight wickets in hand.
The pitch at Lord’s, which had been lively on Days
An eventful #WTC25 Final day 3⃣ of grit and fightback in the Ultimate Test at Lord’s 👊#SAvAUS pic.twitter.com/VYJPIYudlQ
— ICC (@ICC) June 13, 2025
1 and 2, flattened out under the sun, offering the best batting conditions of the match. South Africa capitalized, scoring at 3.80 runs per over. The crowd at Lord’s was electric, with South African fans cheering every boundary, creating an atmosphere charged with anticipation of a potential Proteas victory.
Key Moments and Performances
Australia’s Second Innings: A Fighting Finish
Australia resumed at 144 for 8, with Starc and Hazlewood at the crease. The pair added 59 runs for the ninth wicket, with Starc playing aggressively, scoring 58* off 136 balls, including five fours. His fifty, his first since 2019, was a highlight, showcasing his ability to contribute lower down the order. Hazlewood played a patient 17 off 53 balls, frustrating South Africa’s bowlers. Markram eventually dismissed Hazlewood, and Lyon fell lbw for 2, ending Australia’s innings at 207.


Aiden Markram and Temba Bavuma’s Masterclass
Aiden Markram and Temba Bavuma turned the tide with a 143-run partnership. Markram, starting on 3, reached his fifty off 69 balls and converted it into his eighth Test century, scoring 102* off 159 balls with 11 fours. A notable back-cut off Starc raced to the boundary, earning applause from the Lord’s crowd. Bavuma, despite a hamstring injury that limited his running, played with grit, scoring 65* off 121 balls with five boundaries. His mix of cautious defense and crisp stroke-play was remarkable given his physical discomfort.
Injuries and Fielding Errors
The day saw significant injury concerns. Bavuma’s hamstring injury forced him to hobble between wickets, yet he continued batting, showing immense determination. For Australia, Steve Smith suffered a compound dislocation of his right little finger when a Bavuma edge burst through his hands off Pat Cummins. Smith left the field in agony but returned with his finger strapped, though his discomfort was evident. Additionally, Bavuma, on 43, top-edged a sweep off Nathan Lyon, but substitute fielder Konstas dropped the catch, giving South Africa a crucial reprieve.
Atmosphere at Lord’s
The pitch’s improved conditions allowed South Africa to score freely, reaching 47 for 1 in 10 overs compared to 30 for 3 in 20 overs in their first innings. The Lord’s crowd, particularly South African supporters, created a vibrant atmosphere, cheering Markram’s century and Bavuma’s fifty. The anticipation of a South African victory added to the electric energy in the stands.
Bowling Analysis
Australia’s Bowling Effort
Mitchell Starc was Australia’s most effective bowler, taking 2 for 53 in 9 overs. He dismissed Elgar and Rickelton early, using pace and swing to trouble the openers. However, as the pitch flattened, Australia’s bowlers struggled. Josh Hazlewood (0/43) and Pat Cummins (0/36) bowled tightly but couldn’t break the Markram-Bavuma partnership. Nathan Lyon bowled 18 overs for 51 runs, creating chances, including Bavuma’s dropped catch. Travis Head was tried briefly, but his first ball ragged past Markram without success.
South Africa’s Bowling Effort
Kagiso Rabada led South Africa’s attack with 4 for 59, dismissing Hazlewood and Lyon to wrap up Australia’s innings. His pace and accuracy were key in limiting Australia’s lead. Lungi Ngidi supported with 3 for 38, extracting bounce to trouble the lower order. Marco Jansen and Keshav Maharaj bowled tidily but didn’t take wickets, ensuring Australia’s tail didn’t wag excessively.
South Africa are on the verge of a historic WTC victory, needing just 69 runs with eight wickets in hand. Markram’s century and Bavuma’s resilient fifty have put them in a dominant position. Australia, hampered by Smith’s injury and fielding errors, face an uphill battle to stage a comeback. Day 4 promises a thrilling conclusion at Lord’s, where South Africa could lift the WTC trophy for the first time.
Also Read:ICC WTC 2023-25: Aiden Markram’s 102 Steers South Africa To A Match Winning Position